Imagine yourself for a second a customer that just bought a laptop. They arrive home and want to connect to the internet. The customer wants to do so wirelessly so what do they do? Windows, Linux and Mac OS X each provide a list of Wireless Networks available. Once selected,the customer can provide a password and login. This process is used for hundreds of millions of devices and despite some issues with interoperability, signal strength, and other factors, usually works well.
Consider the same scenario for a customer who just bought a new Wi-Fi enabled Garage Door opener. This device has no native need for an LCD, and will have very few buttons, so connecting it to the network is not straightforward. Most manufacturers prefer to avoid adding unneeded interfaces due to the cost in terms of Bill of Materials, development, time to market and customer support. A Wi-Fi enabled Crock-Pot will have at most a few buttons and LEDs, not more
The initial step of connecting the product to the access point. Simply put, you only have once to make a good impression. IoT devices are inherently designed to help make our lives easier, and making a customer jump through hoops to get their device connected to the internet and running runs against that. Don’t believe me? Looking at Amazon reviews you can see several products returned by customers because of their bad experience installing it and using it. Worse, some customers get turned off to the idea of using these devices.
Making the connection between the device and the router is usually never considered until the user purchases the product. As a developer of consumer goods, its important to understand all the ways the initial connection to the router can be made, their advantages and disadvantages. When looking to implement provisioning, we generally look for the following characteristics:
We can categorize mechanisms for associating the device to the network into two main bins: Specification mechanisms and Vendor mechanisms. Specification mechanisms are typically those specified by the 802.11 or Wi-Fi standards themselves, either mechanisms already built into 802.11 or building on top of existing protocols to make the process of association a breeze. Aside from these mechanisms we cover some of the more popular methods created by vendors, both Wi-Fi chipset and OEMs. There are many many ways to give the Wi-Fi controller the SSID and passphrase or key.
Lets start with Specification mechanisms, especially those built in to 802.11 and Wi-Fi. The first of which is WiFi Protected Setup. Long ago, the Wi-Fi alliance realized that the initial step of connecting the device to the network could be difficult. The passphrase for Wi-Fi can be up to 63 characters long. Most customers don’t readily know it and it can be frustrating to type it into a system with a limited interface.In 2006, the Wi-Fi Alliance released the WPS spec. WPS actually consists of several mechanisms, most optional and some required which need to be implemented if a product wishes to be WPS certified
Only the PIN method is required for WPS certification. In 2011, security researchers found major flaws that allowed an attacked to connect to the Access Point by attacking the PIN method and the implementation of WPS done by some vendors. Using brute force it is possible to recover the PIN of the router and with that the actual key. Although many vendors have released firmware updates that make the attack impractical, the vulnerability itself remains. Some customers have disabled WPS on their routers to avoid the vulnerability. Another issue with WPS Pushbutton method is that an attacker could easily abuse the Pushbutton method by using WPS on another device during the time window that the AP WPS is enabled by a legitimate customer installing a product. This is as simple as pressing a button at the right time.
With all this said, WPS is supported in most if not all Access Points sold today, but has rapidly fallen out of favor due to security vulnerabilities. In fact, reports are that Android P - the latest release of Android - will not support it. We suggest you avoid relying on WPS for your product.
Another popular mechanism for provisioning is making the product begin as an Access Point. WLAN chipsets are very flexible, and many can operate as an Access Point. When the customer starts the product for the first time, the product starts as an Access Point. The customer can then use a laptop or mobile phone to enter the access point and input the information of the actual Access Point to which the product should connect. The product then turns off the AP functionality. Using the credentials given by the user, the products connects to the Access Point. Given that the initial connection uses security such as WPA or WPA2, the transfer of the SSID and key to the product is secure, although it is possible to attack. WPA and WPA2 are vulnerable to dictionary attacks under certain conditions. Since most manufacturers provide short passwords for the product when in AP mode to avoid having the user type a long passphrase, a dictionary attack is possible. There are, however,ways to improve on this mechanism by using a 2D barcode with the information so the customer avoids typing and the passphrase and key can be longer and random.
This method is secure, but has the disadvantage that support for AP mode varies among chipset vendors, and it also requires having a webserver with which the user can interact to input the data. It also adds another step that can confuse some customers.
On of the issues with this approach is that often chipsets support only AP or Station mode. So after the user provides the credentials, the user is disconnected so the device can form the access point connection. This is a problem if, for example, the credentials are wrong. In that case, the system will go back to an access point, but the user doesn't know this has happened.
This approach is low cost because it uses the same Wi-Fi capabilities using a SoftAP, but the lack of real time feedback from the user can result in provisioning issues, as many companies discover when they get support calls from users.
Although Ad-hoc Mode has largely fallen out of favor,due to AP mode, it could be used in the past for provisioning. Basically, when a product is in Ad-hoc mode it can connect directly to another device such as a laptop without using an Access Point as an intermediary. The user connects to the product using Ad-hoc mode via a computer with wireless capabilities, inputs the settings for the credentials of the actual Access Point. The product then connects to the actual AP. Ad-hoc mode is difficult for customers to use, usually counterintuitive and has lost support from WLAN vendors.
Because the 802.11 and Wi-Fi provisioning mechanisms have their issues, product developers are still looking for reliable, secure and commonly available methods to provide credentials to the product to connect. Because of this, various chipset vendors and companies have developed mechanisms that work better. We'll review some of the most common ones and whether you should choose them for your product.
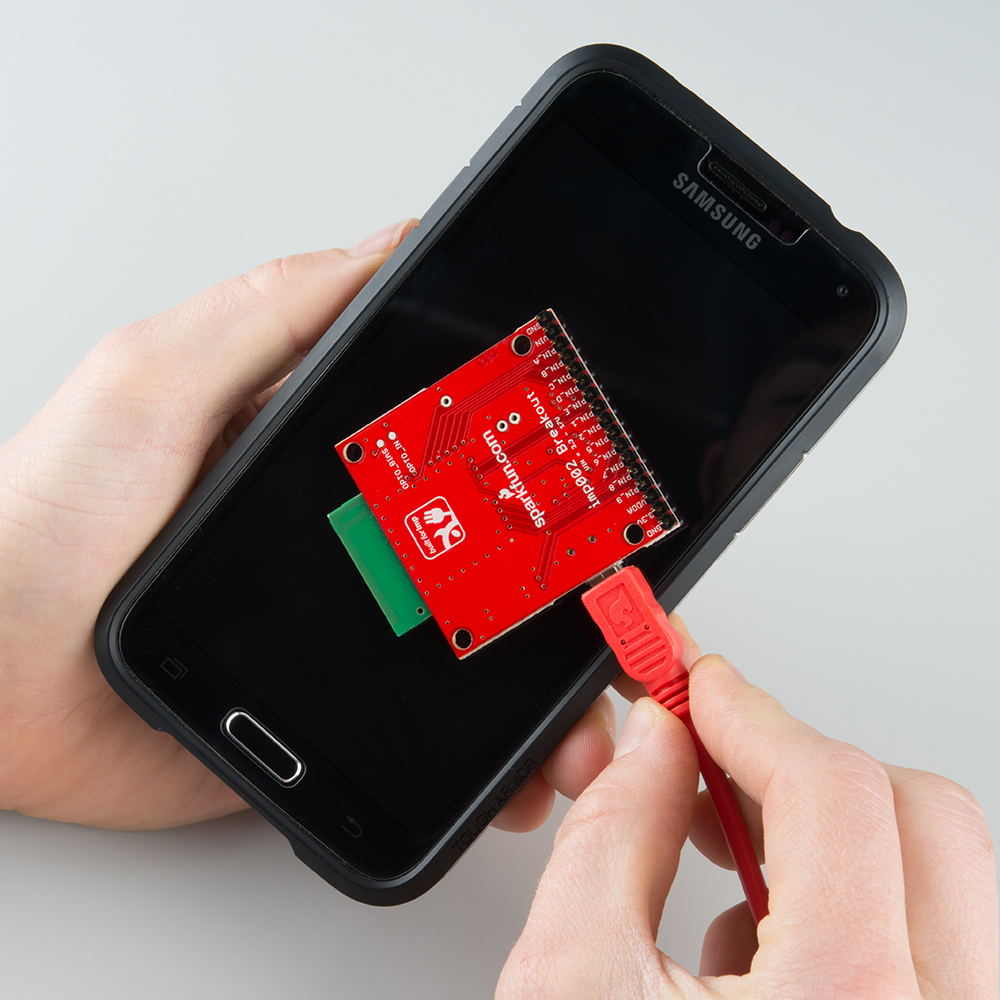
Blink Up is a custom and novel provisioning mechanism created by Electric Imp that works using technology that has long been used. It uses a phototransistor in the product to receive bits from the smartphone screen. The smartphone screen blinks white or black to generate a stream of bits, which the phototransistor can sense. These bits contain the Wi-Fi information and allow the product to communicate. This provisioning method is very low cost, and requires only a simple phototransistor and potentially some LEDs. The downside is that it's mostly one-directional and custom. The user has to place the smartphone screen against the product for it to work. This can be inconvenient in some cases.
Texas Instruments has developed its own Wi-Fi based mechanism called SmartConfig. Technically it is in-band, but since it is vendor specific so we will cover it here. The TI CC3000 is currently the only device known to support the mechanism. At product startup, the Wi-Fi chipset is listening in a special mode that can receive packets from a mobile phone. A special application provided by TI runs on the phone and it can send the SSID and passphrase encrypted by AES. The CC3000 receives the data and forwards it to the microcontroller. The microcontroller, having the AES key decodes the credentials and configures the CC3000 to use them to associate. One issue to consider is key management. If the same AES key is used for all products, attackers could sniff the exchange between the mobile phone and the CC3000 to decode the credentials. Using AES keys for each product requires careful consideration in choosing the key.
Some devices such as printers that support USB allow for provisioning the printer via USB by using a configuration software. This software runs on a PC with Wi-Fi, which finds the nearby Access Points, allowing the user to easily select the AP they want the printer to connect to. The user then provides the passphrase. The printer verifies the connection while USB is connected and can be moved afterwards without any USB connection. The advantage of this approach is that it is reliable and the Wi-Fi connection can be verified before the printer is moved, but it can be a hassle the first time it is setup.
Apple's MFI program is a certification process for your device to become interoperable with Apple Devices. One of the benefits of MFI is that it allows your product to access functionality not normally accessible which requires secure authentication. One of these features is the ability of an Apple device to share its Access point information (including passphrase) with another MFI device to allow for quick provisioning. You can see this feature working in Apple devices themselves when an iPhone detects a nearby Apple watch that is being configured and provides it with configuration information. If your product is made MFI compatible, your product could take advantage of this feature.
This method works nicely but is limited to Apple devices and users, and requires your product to obtain MFI certification which can be challenging to obtain (and requires an addition of an authentication chipset). We typically see this methods used when MFI is required for some other reasons and is already available on the system.
Bluetooth is another mechanism that is already supported by combo Wi-Fi + Bluetooth devices. It is one we highly recommend to use in case you're looking for a reliable solution. In particular, we'll talk about Bluetooth Low Energy. Bluetooth has long been integrated with Wi-Fi since mobile phones typically have to support both to allow connecting to Bluetooth headsets. Bluetooth integrates security that allows a Bluetooth enabled product to connect to a mobile phone and exchange information, such as the association credentials for the Wi-Fi connection. Once the product gets the credentials using BLE, it can connect to the Access Point and the internet. The exchange of information is usually quite secure. Bluetooth Low Energy has quite a few advantages when used for provisioning:
Many devices, especially those that already have a Bluetooth radio, use BLE for provisioning. Examples include the Nest Cam, Amazon Echo, Google Hub and many others. However, your own product will need to have BLE capability integrated to enabled this, which adds cost and development effort. You will also need to integrate Bluetooth LE in your mobile apps.
Product developers have many options to help the initial provision. The right choice is always a balance between cost, speed and security. You should understand how your product will be used and find the right approach to make sure end users get the behavior they expect.
Enter your email address to subscribe to this blog and receive notifications of new posts by email.